This post may contain affiliate links. Please read our disclosure policy.
If you’ve never made something like this before, here’s the simplest way to think about it…
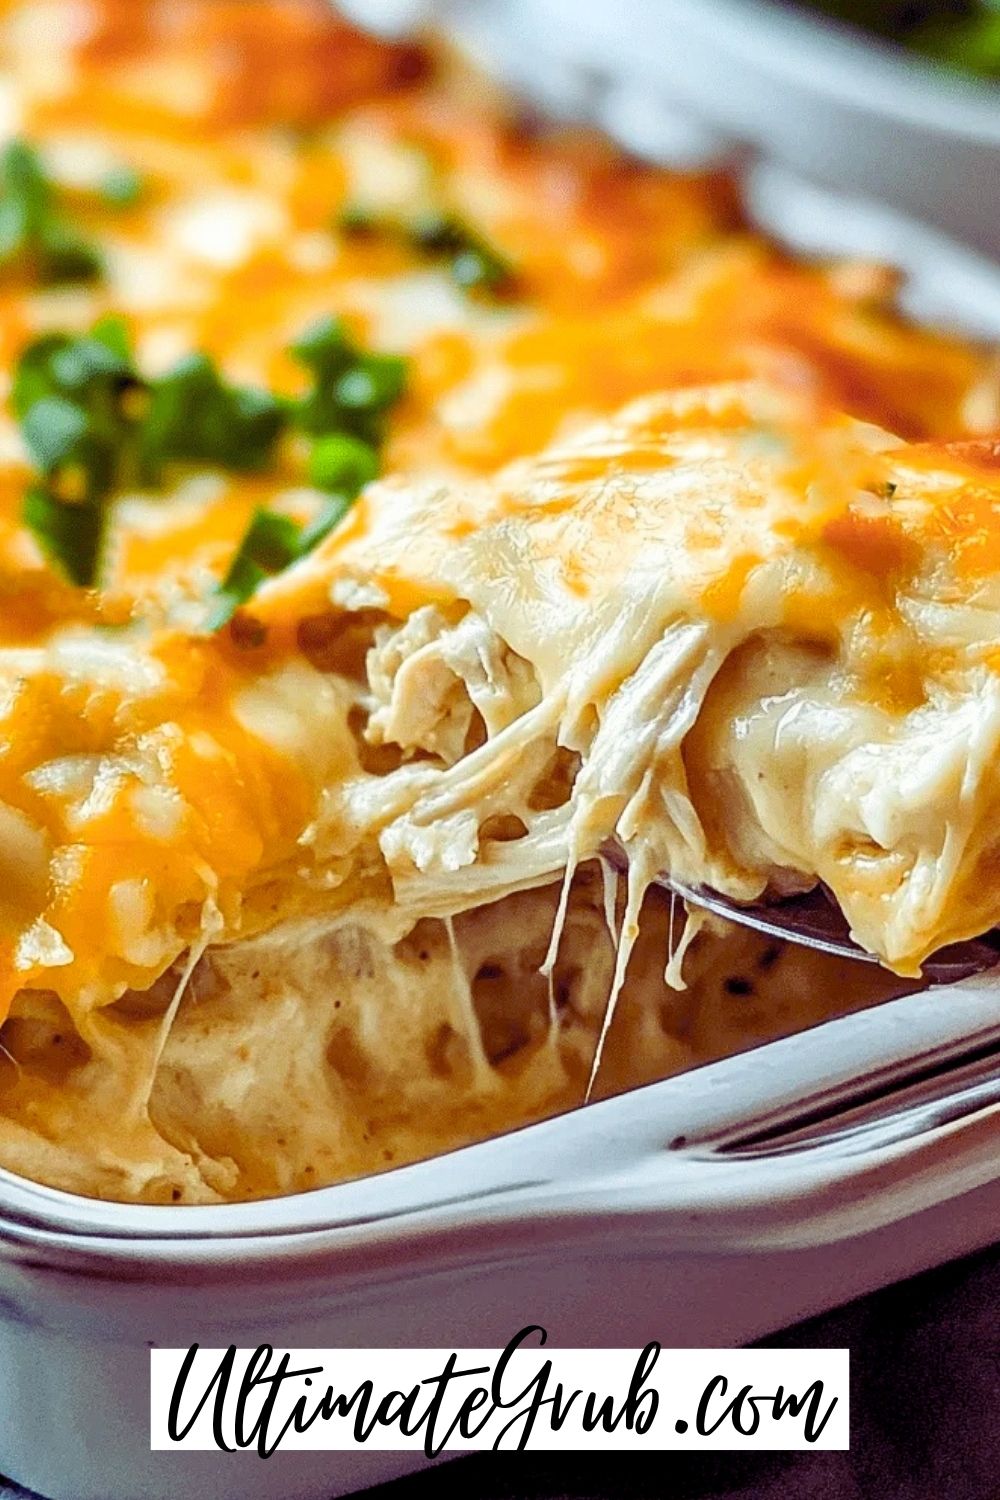
This is enchiladas—but easier, cheesier, and way harder to mess up.
No rolling tortillas. No tearing. No filling falling out while you’re trying to line everything up perfectly.
Instead, you’re layering everything—like a lasagna—but with taco-seasoned chicken, tortilla chips, and a rich, creamy cheese sauce that melts into every single bite.
And here’s the real reason this works so well…
You’re not relying on one layer to carry the dish.
Every layer brings flavor. Every layer brings texture. And when it all bakes together, it becomes one of those meals that people don’t just eat—they go back for more without even thinking about it.
This is comfort food that doesn’t pretend to be anything else.
It’s bold, messy, cheesy—and it absolutely delivers.

Why You’ll Love This Chicken Enchilada Casserole
This recipe works because it builds flavor in stages instead of trying to fix everything at the end.
The chicken is seasoned first.
That means you’re not depending on the sauce to do all the work. The flavor is already there before it even hits the casserole.
Then you’ve got the cheese sauce.
And this is where things get serious.
This isn’t just melted cheese thrown on top. This is a full-on queso-style sauce made with Velveeta, cream cheese, Monterey Jack, Rotel, and green chiles.
That gives you something that’s:
- Smooth
- Creamy
- Slightly spicy
- Thick enough to coat everything
And then the tortilla chips come in.
They start crunchy, then soften just enough in the oven to hold everything together without turning into mush.
That balance is what makes this work.
Not too soft. Not too crunchy.
Just right in the middle where every bite actually feels good to eat.
What You’ll Need
If you’ve never made a casserole like this, don’t overthink it.
You’re building layers. That’s it.
But here’s what matters.
The chicken needs to be fully cooked before it goes in. You’re not baking raw chicken—you’re layering cooked, seasoned chicken so the texture and flavor are already right.
The cheese sauce needs to be smooth.
If it’s clumpy or not fully melted, it won’t spread right and your layers won’t come together the way they should.
And the chips?
They’re your structure.
They replace tortillas and give you that layered feel without the extra work.
Simple—but intentional.
Tools for This Recipe
Ingredients for Chicken Enchilada Casserole
For the Chicken:
- 4–6 boneless skinless chicken thighs or a Rotisserie Chicken
- 1 package taco seasoning
- 1 tablespoon oil
Note: You can also use a Rotisserie chicken from Costco or your local supermarket. Just debone the chicken and shred it up. I find that this saves a ton of time and still has plenty of flavor.
For the Cheese Sauce:
- 2 lb Velveeta, cubed
- 8 oz cream cheese
- 8 oz Monterey Jack cheese, shredded
- 1 (14.5 oz) can Rotel
- 1 (7 oz) can diced green chiles
- Dash garlic powder
- Dash onion powder
For Assembly:
- 1 bag tortilla chips
For Serving:
- Sour cream
- Chives or fresh pico
How to Make Chicken Enchilada Casserole

Start with your chicken—this is your flavor base, so don’t rush it.
Take your chicken thighs and cut them into bite-sized pieces, about 1 inch each. They don’t need to be perfect, but try to keep them roughly the same size so they cook evenly. If you’ve got a mix of tiny and huge pieces, some will dry out while others are still cooking.
Now heat a large skillet over medium-high heat and add about a tablespoon of oil.
Let the oil heat up for a minute—you want it hot before the chicken goes in. If it’s not hot enough, the chicken will just sit there and steam instead of getting that light browning that builds flavor.
Add the chicken to the skillet and immediately sprinkle the taco seasoning over it.
Now stir everything together so every piece gets coated. Don’t just dump the seasoning in one spot—you want it evenly distributed so the flavor is consistent.
Let the chicken cook for several minutes, stirring occasionally.
You’re looking for two things here:
- The chicken is fully cooked through (no pink anywhere)
- You get a little bit of browning on the outside
That browning is flavor—don’t skip it by rushing.
Once the chicken is cooked, remove it from the heat and set it aside.
Now move on to the cheese sauce—this is the heart of the entire dish.
Grab a medium saucepan and place it over medium heat.
Add the Velveeta cubes and the cream cheese first. These are your base cheeses, and they take the longest to melt, so they go in first.
Now here’s the key—stir constantly, but don’t crank the heat.
If you rush this with high heat, the cheese can scorch or separate, and then you’re fighting texture problems the rest of the time.
At first, it’s going to look messy. Clumpy. Kind of broken.
That’s normal.
Keep stirring. As the heat works through, it will start to smooth out into a thick, creamy base.
Once those cheeses are mostly melted, add in the shredded Monterey Jack.
Keep stirring until everything melts together into a smooth, glossy sauce. You shouldn’t see any unmelted chunks at this point.
Now add the Rotel tomatoes and diced green chiles.
Stir everything together and let it heat through for a couple minutes. The tomatoes will release liquid, which will loosen the sauce slightly—but it should still be thick, not watery.
Now add a dash of garlic powder and onion powder.
This is where you give the sauce that extra layer of flavor.
Take a second and taste it.
Seriously—taste it.
If it needs a little more seasoning, add it now. Once it’s in the casserole, it’s harder to adjust.
Once the sauce is smooth, creamy, and fully combined, remove it from the heat.
Now it’s time to build the casserole—and this is where people tend to get sloppy. Don’t.
Preheat your oven to 350°F and lightly spray your 9×13 baking dish with nonstick spray.
Start with your first layer of tortilla chips.
Spread them across the bottom of the dish. Don’t crush them into dust—you want them mostly intact so they give the casserole structure. Some overlap is fine, but try to cover the bottom evenly.
Now add your first layer of chicken.
Spoon it over the chips and spread it out so every section gets some. You don’t want one corner loaded with chicken and another with nothing.
Now add your first layer of cheese sauce.
Pour it over the chicken, then use a spoon or spatula to spread it out evenly. Make sure it reaches the edges—this helps everything cook evenly and keeps dry spots from forming.
Now repeat the layers.
Add another layer of chips, then chicken, then cheese sauce.
Take your time here.
You’re building the dish, not just stacking random ingredients. Even layers = better texture and flavor in every bite.
Keep going until the dish is nearly full.
Finish with a final layer of cheese sauce on top.
Now sprinkle a little extra Monterey Jack over the top.
This is what gives you that melted, slightly golden, irresistible top layer.
Place the dish in the oven and bake for about 30 minutes.
You’re looking for a few signs that it’s ready:
- The cheese is fully melted
- You see bubbling around the edges
- The top is just starting to get lightly golden
If it’s not quite there, give it another 5–10 minutes.
Now—this part matters more than people think.
Take the casserole out of the oven and let it sit for about 10 minutes before serving.
Do not skip this.
Right out of the oven, everything is super loose. If you scoop it immediately, it’s going to fall apart and look messy.
Letting it rest allows the layers to settle and firm up just enough so you can actually serve it cleanly.
Now serve it up.
Top it with a dollop of sour cream and some chives or fresh pico if you want to brighten it up.
And that’s it.
Layered, cheesy, bold comfort food—done right.
Substitutions & Variations
Keep it simple.
Swap chicken for rotisserie to save time.
Use Pepper Jack if you want heat.
Add beans or corn if you want to stretch it—but don’t overload it.
This works because it stays focused.
What to Serve With Chicken Enchilada Casserole
You don’t need sides—but they help balance it.
Mexican Rice, beans, or a simple salad work well.
Or just eat it straight. No judgment.
Leftovers & Storage
Store in the fridge up to 4 days.
Reheat with a splash of moisture if needed.
It reheats well—even better the next day.
FAQs
Why did my casserole turn out too soft or mushy?
This usually comes down to moisture and layering.
If your chips are completely mushy, it’s likely because there was too much liquid in the cheese sauce or the chiles weren’t drained enough. Chips are meant to soften slightly, but they should still hold some structure.
Another thing to look at is how you layered it. If you poured too much sauce in one spot instead of spreading it evenly, it can overload certain sections and make them break down too much.
To fix this next time, make sure:
- Your chiles are well drained
- You’re spreading the sauce evenly
- You’re not drowning the chips in one layer
You’re aiming for softened, not soggy.
Can I make this casserole ahead of time?
Yes—and this is actually a great make-ahead recipe.
You can fully assemble the casserole, cover it, and refrigerate it for up to 24 hours before baking. When you’re ready, just bake it as directed—though you may need to add 5–10 extra minutes since it’s starting cold.
You can also bake it completely, let it cool, and then reheat it later. The texture holds up well, and the flavors actually deepen a bit as it sits.
Just make sure you:
- Let it cool before storing
- Cover it tightly
- Reheat gently so it doesn’t dry out
This makes it perfect for meal prep or feeding a crowd.
Can I make this spicier without ruining the flavor?
Absolutely—and you’ve got a few good options.
The easiest way is to use hot Rotel instead of the mild version. That alone adds a noticeable kick without changing the flavor too much.
You can also:
- Add diced jalapeños into the cheese sauce
- Use Pepper Jack instead of Monterey Jack
- Add a few dashes of hot sauce to the sauce mixture
The key is not overdoing it in one place. Spread the heat out so it builds instead of overwhelming the dish.
You want balanced heat—not just spice for the sake of spice.
Can I use tortillas instead of tortilla chips?
Yes, but the texture will be different—and you should know that going in.
Tortilla chips give you structure and a slightly firmer bite after baking. They hold up better and create more defined layers.
Tortillas, on the other hand, will soften a lot more—closer to traditional enchiladas. That’s not bad, just different.
If you use tortillas:
- Cut them into strips or layers
- Don’t overload with sauce
- Expect a softer, more uniform texture
Both work—it just depends on what you want.
How do I know when the casserole is actually done?
You’re looking for a few clear signs.
First, the cheese on top should be fully melted and starting to bubble slightly. You may even see a little browning around the edges—that’s a good thing.
Second, the center should feel set—not liquid or jiggly. If you gently press the middle with a spoon, it should hold its shape.
If it still feels loose, give it another 5–10 minutes.
And finally—let it rest.
This is huge.
If you cut into it immediately, it will fall apart. Letting it sit for about 10 minutes helps everything firm up so you can actually serve it cleanly.
Final Thoughts
This is one of those recipes that just works.
It’s cheesy, bold, simple, and seriously satisfying.
No complicated steps. No stress. Just layer, bake, and eat.
And now—with the right details?
You’ll actually nail it the first time.

